Original Side sill inner reinforcement


construction example 1 [Jul,26,2014 ]
construction example 1 [Jul,26,2014 ]
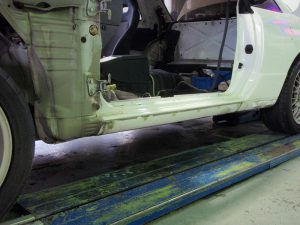
Today, we would like to our original part.
This part is attachable for only Skyline BNR32GTR.
It is unadoptable for any other type of car except for skyline and R32 4 door type.
We were supposed to produce only one but since it was pretty good, we decided to mass-produce for people who need our original parts.
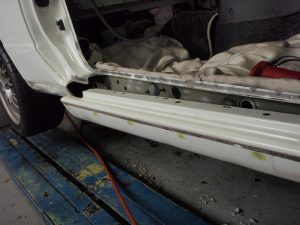
Note:the part might be modified and looks bit different from the picture.
We cut BNR32 side sill outer in round slices to look inside easily.
The inside is hollow and looks unreliable.
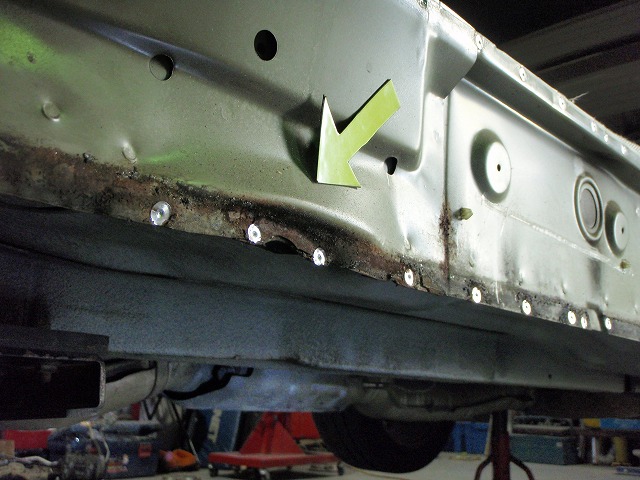
The arrow symbol indicate the jack up the point of the left front.
If trying to lift BNR32 up by a jack point, it will crush its side sill outer.
This is BNR32’s week point.
The old days, some customers asked us to fill the hollow by Urethane foam.
The owners of BNR32 must be worried about the damage of jack up point.
This damage is hardly repairable and will be easily damaged again when jacking up.
The side sill in the above photo is not too bad if compared to other ones.
You can see how weak it is by looking at the direction of bending the panel.
The side sills of BNR32 is vulnerable to vertical direction.
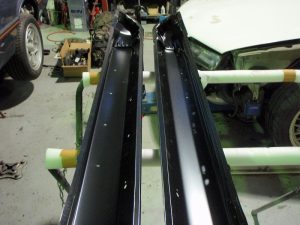
The component we introduce today is not to prevent from crushing but strengthen the side sills.
Our customer who is the owner of BNR34 ordered us to reinforce his car’s side sills because its parts have been discontinued. That’s the reason we determined to produce our original side sills.
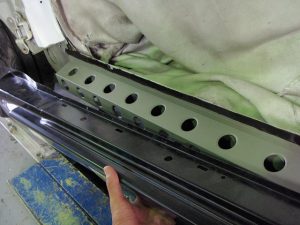
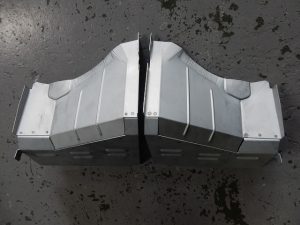
The component part is three points of one side.
Inter panel made of 1mm iron plate is saved its weight by burring process.
The five drain holes on one side work without problems with the component because It is designed to fit with this side sill outer.
In addition, we weld U-shaped panel to base inner which is made of 1mm metal plate.
The strength is improved by welding box type panels to flat panels.
It is also resistant to the distortion and enhance the body rigidity.
The each weight is about 4kg which is relatively light so it can’t be weight handicap.
This stocky reinforcement as rough as side frame must make you excited!
We paint the same color as the original color. You can’t see the difference. Don’t you?
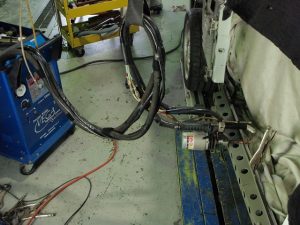
We temporarily fix the reinforcement and attach outer panel and then, move on to spot welding.
Once outer panel attached, you may never see again.
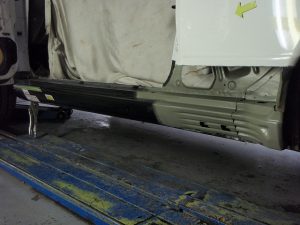
After that, we paint the spot hidden by rear fender and move on to welding processed rear fender.
I would like to sum up what has been discussed so far.
- Cut rear fender and the lower part of front pillar
- Remove side sill outer
- Attach metal sheets to inner and jack-up spot
- Attach reinforcement plate
- Weld side sill outer
- Weld processed panel
How about today’s topic for our original reinforcement component?
I, myself, have driven BNR32 for over 20 years and my car’s jack-up spot is also crushed. lol
I don’t have any opportunity for fix it but I will attach our original component in the near future.
Rigidity is much improved even compared to spot welding
GTR which we introduced the above is in the process of working so we may convey the differences next time.
*The specification may be modified to improve the future if needed.
If you are interested in this component, please don’t hesitate to ask!
Please contact usConstruction example 2 [Jul,23,2017 ]
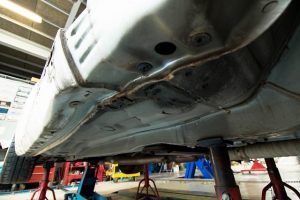
Hello everyone!
This quite sudden, look at those painful crushed side sills.
However, after using our highly skills, look at this!
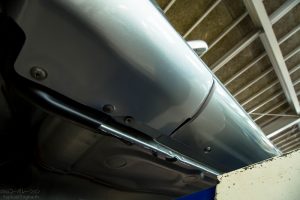
It changed like a new!
Today’s topic is the process of repairing your crushed side sills.
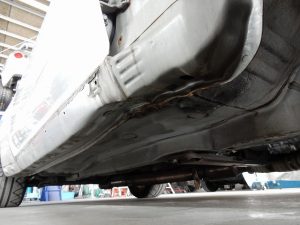
We have introduced several times, but please see the above photo, this is jack-up point of R32 side sill panel. It happens with high probability if you own BNR32.
To be honest, we don’t understand why this weak component was adopted for this weight car.
If you don’t mind driving with crushed side sills, you can skip this article but we suppose most owner of R32 concerned with them.
Today, we explain how to fix them with our original side sills.
Depending on the condition of crush, the space between front fender and door or sidestep could be affected.
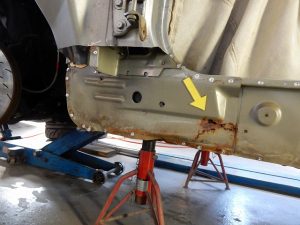
After removing ide sill outer panel, you can see the inner structure which is the below photo.
When jack-up point is crushed, inner panel will be also crushed.(arrow part in the above pic)
If inner panel is crushed, a gap is formed between inner and outer and it makes rainwater penetrated and got rusted.
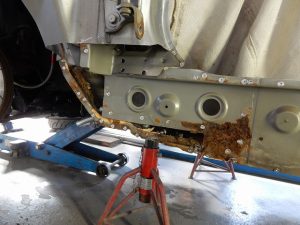
This is the condition after removing the top of inner panel. The back spots of panel which have holes are badly rusted. This part usually has 4 panels and if they are seriously rusted, you need to change all of them.
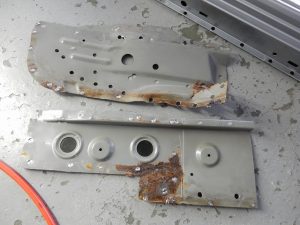
Bent and rusted panels must be repaired.
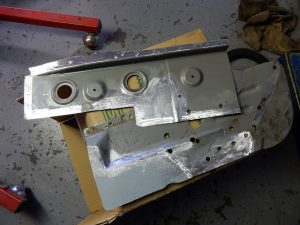
After repair, the rusted spots can’t be welded so we remove them and replace with new metal sheets.
You may understand repairing the side sills take a lot of trouble.
Even after repair, if you ask someone to inspect your car, change the oil or something, this problem will occur when the jack-up point is lifted.
If people who are experienced and knowledge about BNR32, they avoid lifting up by the point.
However, most people don’t know its car’s problem and let it happen again.
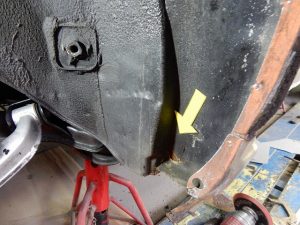
This spot in R32 are frequently rusted as well.
It is the front of rear tire house which is located the back of side sill.
It also frequently happens but it is bit hard to fix only this part.
But when replacing side sill outer, it won’t be a so big trouble.
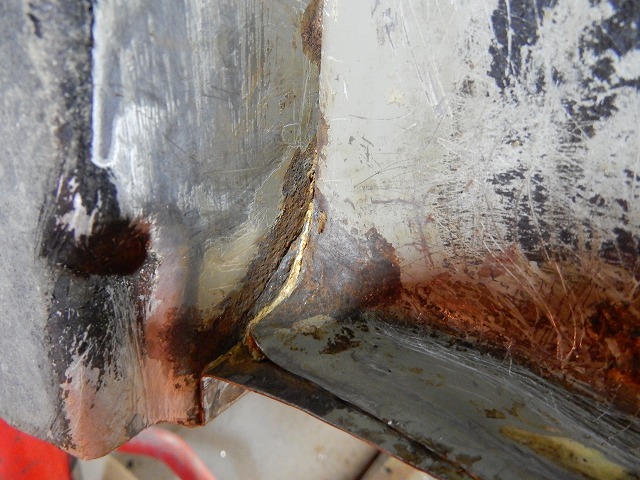
This part is also constructed by some components so we have to repair orderly.
If you ask other factories to estimate for the repair and the answers are like 30,000~40,000yen, you should confirm them how they will process working.
They might only sand the surface and paint under coat which is called “pretended repair”.
If they are real repair shops, they know the fix can be harder depending on the condition of the back of panel so it can’t be cheap.
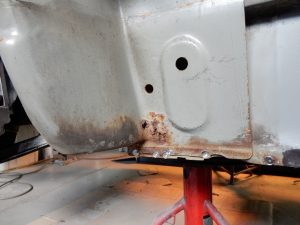
This is the statement after removing side sill outer and the inside panel.
Now you can see why we mentioned “it is bit hard to fix only this part.”
It is hard to reach the deepest panel. lol
After replacing the nozzle and increase its pressure, high-pressure washing can be possible.
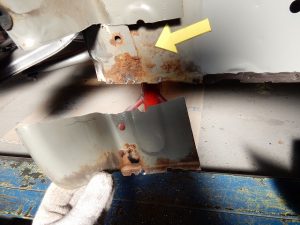 Deeper panel.
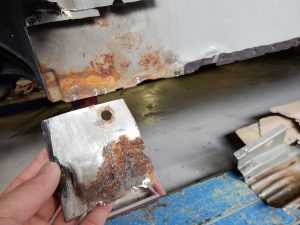
deeper and deeper panel.
Rusting like that, it will affect other panels touching it.
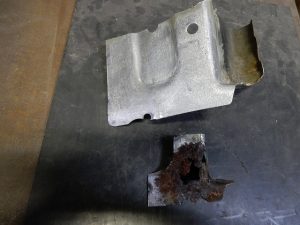
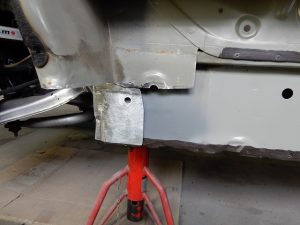
Cutting rusted parts and replace new ones. It is called “cut and paste repair”.
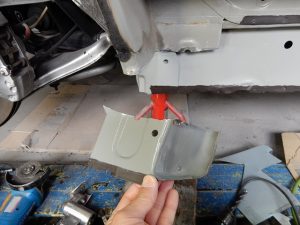
The part can’t be seen after installed, but we still paint and weld
In addition, we process some works to prevent this part from rusts by thin brushes after welding.
The process is not like TV show which introduce only before and after.
It’s what’s inside that counts.
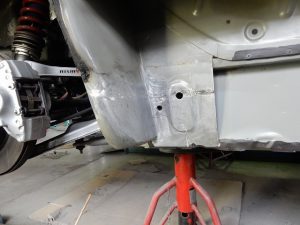
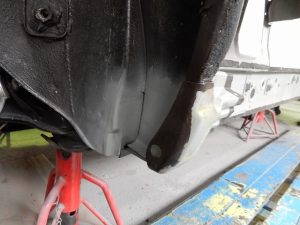
Please compare this photo with the first one.
Now you may understand the flow of repairing complicated panels.
After all, repairing the surface has no meaning if considered durability.
So when you request ask someone to repair your cars, please confirm the way to repair.
Everyone wants cheaper and better, but it doesn’t work for repairing cars.
For the repair cost of this work, the estimate from our company is…
(This is the estimate of the work after removing outer panel)
1. 50,000 yen – Removing the most outside panel of side sill inner
2. 12,000 yen – Processing holed spots of the second inner
3. 8,000 yen – Cutting and pasting the metal plate of the third inners
4. 8,000 yen – Removing the rusts of the fourth metal plate
Therefore, the total cost is 33,000 yen.
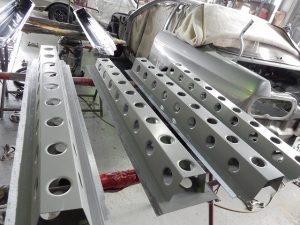
We check each part around side sills when installing our original side sills such as the operation we introduced in this page. We would recommend you to ask us to repair the other parts.
The completion date of installing the side sills and the repair is roughly a month.
If you would like to paint all parts, the date would be roughly 2 or 3 months.
Please don’t hesitate to ask us if you are concerned about the crushes of R32 side sills.
We can surely give you the solution.
| 今回ご紹介しましたBNR32専用の補強パーツいかがだったでしょうか? 私自身BNR32をもうかれこれ20年以上乗ってまして皆さんと同じようにジャッキUPポイントが潰れてたりします(笑) なかなか自分の車はいじれる暇と機会がないのですが私のGTRにも装着してみたい!と作業しながら思ってしまいました。 おそらくスポット増しよりもうワンランク上の剛性が得られるはずです。 今回ご紹介したGTRは※今現在作業途中ということもありまして走行はまだしておりませんが、変化の違いなんかも今後お伝えしていきたいと思います。 ※2014 7/26 今後商品化に向けて改良を重ねていきますので予告無く仕様変更をする場合もございます。 一般の小売も考えておりますのでご興味を持たれた方はお気軽にお問い合わせください。 |
千葉県 O様
田口様
4日はどうもありがとうございました。
走った感じですが、非常に安定していて全体的にがっしりしています。
※速度を出しても全然恐怖感が無いです。
※●●程しか出してませんが・・・
乗り心地も良くなっていると思います。
※段差を乗り越えてもショックが少ないです。
後、合計8kgの重量増とのことでしたが、特に重くなった感じはありません。
※ホイールベース内だから影響もほとんどないと思います。
御社に依頼して正解でした。
メンテなどでまたご依頼することもあるかもしれません。その際はよろしくお願いいたします。
追記
ガラスコーティング実施していただいたのですが、普通に洗車してもいいのでしょうか?
また、効果はどのくらい効きますか?
あとレイマックスのマフラーですが、保証書?みたいなものはなかったでしょうか?
愛知県 W様
田口さま
ご無沙汰しております、愛知の渡會です。連絡が遅くなりました。
納車から千キロほど走行しました。帰りの高速では少し雨に降られただけで済みました。
車の感じですがインターに乗る前の下道でも「あれ・・・前の32とは違うな!なんか35っぽい感覚がするような気がする。」それが第一印象でした。
圏央道に入ってからはタイヤの慣らしと、自分のリハビリを兼ねて交通の流れに乗って走りました。
サイドシルの補強のおかげで剛性が上がっているのが流しているだけで判ります。
道路の繋ぎを越えた時の収まりの良さ、ハンドルに対する追従性の良さ、思わず二ヤケテしまいました!
東名は雨の夜道でしたが、LEDヘッドライトのおかげで運転が楽でした。ありがとうございます。
あとはフェンダーとタイヤのクリアランスの確認の為に地元のバイパスで●●キロからブレーキを踏んで、家に戻りました。
翌日コーティングに持って行って磨いて貰って、とりあえず完成です。
ただ家の周りの道は国道とは名ばかりの田舎道です。車体がしっかりしたら今までの足では跳ねてしまって踏めません。
とりあえず縮みを二つ戻して乗ってみて、少しふわふわするので伸びを一つ締めて乗っています。補強で変わるものですね!
あと1センチ車高を上げてストロークを稼げば乗りやすくなるのは分かっているのですが出来ません。若いなぁ~
それと車庫の中で見るより外で眺める方が数倍素敵です。
以前の状態でも十分綺麗に見えていた筈なのにやっぱり別物ですね!BPさんにお願いして良かったと思います。
この車に乗り続ける限り、またお世話になる事も有ると思います。その機会には是非ご協力お願いします。
埼玉県 M様
有限会社ビーピーコーポレーション 田口さま
お久しぶりです。
その後の経過報告していなくて申し訳ございません。
今もスカイラインは元気に走っています。
ボディを固めた事で街乗りは段差等の衝撃が前よりも伝わりますが、それはそういった車に乗ってるて事で妥協しております。笑
そもそも補強をした目的としては大変満足しており、フロントを固めた事によって今まででも十分だと感じていたステアリング操作に対してのフロントの向きがさらにシャープに変わるようになりました。
そして、補強プレート、ドア回りのスポット増しをしたことによってフロントの動きに対してよれて着いてくる感じがなくなり滑る感じが大変よくわかるようになりました。また、ドリフト中もアクセルに対して素直に滑る、止まるができて楽しいです。
ただ、トラクションアップに関しては感覚としてアップしたかな~位ですね。そこは古い車なので仕方ないと思っています。
メールにありますフロントレインフォースはまだありますか?大変興味があるのですが、これはアルミ製ですか?
今年は車検もあるのでまたお願いしたいと考えているのですが、ただ、現在私事で大変忙しくて2月以降にならないとお伺いできない状態となっております。
よろしくお願いいたします。

